

Halloween and spooky season have become synonymous with creativity, and there’s no better way to express your artistic side than through makeup. Among the various themed looks, skeleton makeup stands out as a favorite for those looking to achieve both Makeup Skeleton elegance and horror with a spooky transformation. This versatile makeup look can range from subtle, skeletal accents to a full-on bone-chilling skeleton, making it a fantastic choice for a variety of occasions—from Halloween parties to theatrical performances.
If you’ve ever wondered how to achieve the perfect skeleton look, this comprehensive guide will walk you through everything you need to know. Whether you’re a beginner or an experienced makeup artist, you’ll find all the tools, tips, and tricks necessary to master the art of skeleton makeup. So, get ready to take your makeup game to a whole new spooky level!
Key Takeaways
- Skeleton makeup is a versatile and creative technique that allows for various interpretations, from glamorous to spooky.
- Essential tools for skeleton makeup include white and black face paints, contour kits, setting powders, and brushes.
- Key steps to achieving a skeleton look involve outlining the skull, contouring for depth, drawing the teeth, and adding details.
- Setting your makeup is crucial to ensure it lasts throughout the event or night.
- Optional finishing touches like fake blood, glitter, and contact lenses can elevate the look and make it even more dramatic.
What is Skeleton Makeup?
Skeleton makeup is a popular makeup technique that involves creating a skeletal, bone-inspired look on the face and sometimes the body. It often mimics the anatomy of a human skull, including details such as the eyes, cheekbones, nose, and jawline. Depending on the style, the skeleton makeup can either be highly detailed with a realistic appearance or more abstract and artistic.
This makeup technique has gained popularity due to its versatility. Whether it’s for Halloween, Day of the Dead celebrations, or a creative photoshoot, skeleton makeup allows individuals to express their creativity in an eye-catching and dramatic way.
Tools and Products Needed for Skeleton Makeup
Before diving into the step-by-step process, let’s gather the tools and products that will make your skeleton makeup a success. Having the right products will ensure your look stays intact for hours and delivers the desired results.
Basic Makeup Kit:
- White Face Paint: The foundation of skeleton makeup, usually a white cream or water-activated paint, is necessary to create the base of the skull.
- Black Face Paint or Eyeliner: This is used to outline the eyes, nose, and other skeletal features. A long-lasting black eyeliner or cream paint can work well for this purpose.
- Gray or Brown Face Paint (Optional): To add depth and shadow, gray or brown face paint can help mimic the hollowed-out areas of the skull, like around the cheekbones or eyes.
- Blending Sponge or Brush: This is crucial for applying and blending face paints smoothly on the skin, ensuring an even finish.
- Setting Powder or Spray: To keep the makeup intact for extended periods, setting powder or a setting spray is essential, especially for long nights of fun or a performance.
- Contour Kit: Using a contour kit with cool shades can add dimension to your face and make the bones appear more lifelike.
- Fine Detail Brushes: For intricate details like the cracks, teeth, or jawline, fine brushes will help create precision.
- Fake Blood (Optional): If you want to add a little extra gore to your skeleton look, fake blood can make your transformation even more chilling.
Optional Tools:
- Contact Lenses: For an extra touch of realism, white or black sclera lenses can enhance the eerie look, making your eyes appear hollow.
- Glitter or Gems: For a creative or glam skeleton look, adding gems or glitter can give the makeup a shiny, otherworldly effect.
Once you have all the tools, it’s time to start creating your spooky transformation!
Step-by-Step Guide to Makeup Skeleton
Creating skeleton makeup can be a fun and rewarding process, but it’s important to follow the steps carefully to achieve the best results. Whether you’re aiming for a spooky, haunting look or something more chic, these steps will guide you in mastering the art of skeleton makeup.
Step 1: Prepare Your Face
Start by cleaning your face with a gentle cleanser and then moisturizing to create a smooth canvas for your makeup. It’s also a good idea to apply a primer to ensure that the makeup adheres properly to your skin and lasts longer. Let the primer absorb before proceeding to the next step.
Step 2: Apply the White Base
Using your white face paint, cover your entire face. You can use a sponge for smooth, even coverage or a brush for more precision. Be sure to blend the paint down to your neck if you’re planning to extend the skeleton look beyond your face. Allow the base to dry for a few minutes before moving on to the next step.
Step 3: Outline the Skull
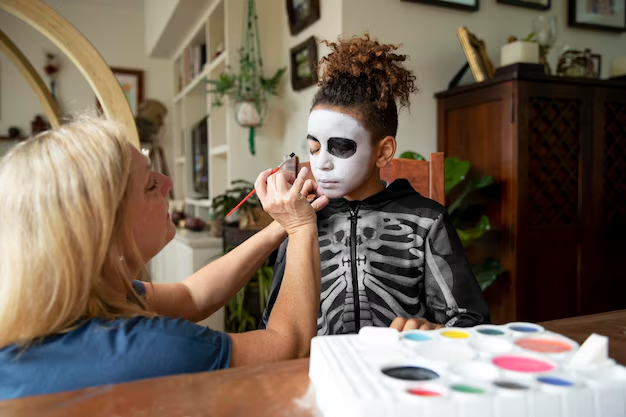
With black eyeliner or face paint, begin outlining the skeletal features. Start with the eyes—draw large, darkened circles around the eyes to create the hollow eye sockets. For a more dramatic look, extend the lines toward the temples. Next, draw the nose by creating a triangular shape that mimics the nasal cavity. Use a fine brush to create a sharp and precise outline.
Step 4: Contour for Depth
To add dimension and make the skeleton features more realistic, use a contour kit with cool tones (gray or brown). Lightly shade around the temples, jawline, and cheekbones. Blend well to create natural shadows that mimic the hollows and curves of a skull. Add more depth by shading around the nose and the eye sockets to enhance the skull-like structure.
Step 5: Draw the Teeth
For the mouth area, sketch the outline of the teeth. This can be done with black face paint, making sure the teeth are proportional and spaced out evenly. Begin by drawing the upper jaw and then move to the lower jaw. Once you’ve outlined the shape of the teeth, fill in the gaps with white paint to create a sharp contrast with the black outlines. Add some shading to make the teeth look more realistic.
Step 6: Add Details and Refine the Features
Now that the main skeletal features are outlined, go back and add finer details such as cracks in the skull, shading on the bones, and fine lines around the eye sockets. Use a small brush to create subtle lines that represent bone fractures or cracks. These details add a layer of realism to your look.
Step 7: Set Your Makeup
Once you’ve completed all your details, it’s time to set your makeup. Use a translucent setting powder or setting spray to ensure that the makeup stays in place throughout the day or night. The setting powder will help to lock everything in, keeping your skeleton makeup fresh and intact.
Step 8: Optional Finishing Touches
To enhance your skeleton makeup, you can add some optional finishing touches. Consider applying glitter around the eye area for a glamorous touch, or use fake blood around the mouth or nose to give it a more eerie look. You can also wear black or white contact lenses for an even more chilling effect.
Mastering The Art Of Makeup For Skull: A Guide To Unique And Bold Looks

Makeup for skull designs has gained increasing popularity, especially during events like Halloween and Day of the Dead. This unique and artistic form of makeup allows individuals to embrace their creativity and transform their faces into mesmerizing skull art. Whether you’re a professional makeup artist or a beginner looking to experiment with new techniques, skull makeup offers endless possibilities for creating striking and bold looks that captivate attention.
Creating a skull makeup look involves a blend of creativity, precision, and the right set of tools. From selecting the appropriate makeup products to mastering the art of shading and contouring, every step plays a crucial role in achieving a realistic and captivating skull appearance. The process involves understanding facial anatomy, experimenting with colors, and utilizing brushes and sponges to blend and define features effectively. With practice and patience, anyone can learn to create stunning skull makeup designs that leave a lasting impression.
Whether you’re preparing for a themed party, a photoshoot, or simply exploring your artistic side, mastering makeup for skull designs opens up a world of creativity and self-expression. By exploring different techniques and styles, you can tailor your skull makeup to reflect your personality and artistic flair. In this comprehensive guide, we’ll explore various aspects of skull makeup, from essential tools and techniques to expert tips and step-by-step instructions for creating show-stopping looks.
Understanding Skull Makeup
Skull makeup is a form of face painting that transforms the facial features to resemble a skull. It is particularly popular during Halloween and the Day of the Dead celebrations. This style of makeup involves intricate designs and a detailed understanding of facial structure to create a realistic skull appearance. The fascination with skull makeup lies in its ability to blend art with anatomy, offering a unique platform for self-expression and creativity.
What is the Significance of Skull Makeup?
Skull makeup holds cultural significance in various traditions. In Mexican culture, it is an essential part of the Day of the Dead celebrations, symbolizing the cycle of life and death. The vibrant and colorful skull designs, known as calaveras, celebrate the lives of loved ones who have passed away. In other contexts, skull makeup serves as a powerful tool for artistic expression, allowing individuals to explore themes of mortality, identity, and transformation.
Essential Tools for Skull Makeup
To create stunning skull makeup designs, having the right tools is crucial. Here are some essentials:
- Quality face paints or makeup palettes with a range of colors
- Various brushes and sponges for blending and detailing
- White and black eyeliner or face pencils for outlining
- Setting spray to ensure the makeup lasts longer
- Reference images or sketches for design inspiration
How to Choose the Right Products for Skull Makeup?
Choosing the right products for skull makeup is essential to achieve a professional and long-lasting look. Here are some tips:
- Select high-pigment face paints or makeup products for vivid colors
- Opt for water-based paints for easy application and removal
- Use hypoallergenic products if you have sensitive skin
- Invest in quality brushes and applicators for precision
Step-by-Step Guide to Creating Skull Makeup
Creating a skull makeup design requires patience and practice. Follow these steps for a basic skull makeup look:
- Start with a clean and moisturized face.
- Apply a white base using face paint or makeup to cover the entire face.
- Outline the skull design using a black eyeliner or face pencil, focusing on the eyes, nose, and mouth.
- Fill in the outlined areas with black face paint or makeup.
- Use grey or black shades to add shading and contouring for a realistic effect.
- Highlight prominent areas with white or light-colored makeup to enhance depth.
- Set the makeup with a translucent powder or setting spray.
How to Master Skull Contouring and Highlighting?
Contouring and highlighting are crucial techniques in skull makeup to create depth and dimension. Here’s how to master them:
- Identify the natural hollows and high points of your face.
- Use darker shades to contour the hollows and lighter shades to highlight the high points.
- Blend the colors seamlessly for a smooth transition between shades.
Tips for Perfecting Skull Eye Makeup

The eyes are a focal point in skull makeup, and perfecting this area can elevate the entire look. Consider these tips:
- Use black eyeliner to define the eye sockets and create a dramatic effect.
- Experiment with different shapes and styles to suit your design.
- Add eyeshadow or face paint to enhance the depth and intensity around the eyes.
How to Create Realistic Skull Teeth?
Creating realistic skull teeth is a defining feature of skull makeup. Follow these steps:
- Outline the shape of the teeth using a fine brush and black face paint.
- Fill in the teeth with white paint, leaving gaps for the outline.
- Add shading between the teeth for a more realistic appearance.
Common Mistakes to Avoid in Skull Makeup
While creating skull makeup, it’s easy to make mistakes that can affect the final look. Avoid these common pitfalls:
- Overblending, which can blur the design details.
- Using low-quality products that don’t provide enough pigment.
- Ignoring skin preparation, leading to uneven application.
Inspiration from Famous Skull Makeup Artists
Several makeup artists have gained recognition for their stunning skull designs. Explore their work for inspiration:
- Alexis Stone – Known for hyper-realistic transformations.
- Desi Perkins – Combines beauty with intricate skull art.
- James Charles – Features bold and colorful skull creations.
How to Make Skull Makeup Last Longer?
To ensure your skull makeup stays flawless throughout the event, follow these tips:
- Start with a primer to create a smooth base.
- Use setting spray or powder to lock in the makeup.
- Avoid touching your face to prevent smudging.
Skull Makeup for Different Occasions
Skull makeup is versatile and can be adapted for various occasions beyond Halloween:
- Day of the Dead celebrations with colorful and intricate designs.
- Themed parties with customized skull looks to match the theme.
- Photoshoots showcasing creative and artistic skull art.
How to Remove Skull Makeup Safely?
Proper removal of skull makeup is essential to maintain skin health. Follow these steps:
- Use a gentle makeup remover or cleansing oil to break down the makeup.
- Wash your face with a mild cleanser to remove any residue.
- Moisturize your skin to restore hydration.
Exploring Advanced Skull Makeup Techniques
Once you’ve mastered the basics, explore advanced techniques to enhance your skull makeup skills:
- Incorporate prosthetics for a 3D effect.
- Experiment with UV-reactive paints for a glow-in-the-dark look.
- Use airbrushing for a smooth and professional finish.
Frequently Asked Questions About Skull Makeup
Here are some common questions and answers about skull makeup:
- Is skull makeup suitable for all skin types? Yes, but it’s important to choose hypoallergenic products for sensitive skin.
- How long does it take to create a skull makeup look? It depends on the complexity of the design, but typically it takes 1-2 hours.
- Can skull makeup be customized for different themes? Absolutely, you can tailor the colors and details to fit any theme or occasion.
Gathering Your Makeup Kit For Halloween Skull Makeup

Creating a stunning skeleton makeup look doesn’t have to be an expensive process. Most of the essential items for achieving an eerie yet elegant skull appearance are likely already in your Ben Nye SFX kit.
Here’s what you’ll need for an effective skull easy Halloween makeup:
- Mehron Paradise Makeup: Available in essential black and white, Mehron Paradise face paints are a staple for any skeleton makeup look. They’re water-activated, making them simple to apply and remove. While they may need touch-ups for long-lasting wear, their affordability and quality make them a top choice for various makeup routines.
- Black and White Eyeshadow: Opt for matte finishes to improve your skull makeup. Brands like Ben Nye offer fantastic eyeshadows that help in creating depth and shadow effects essential for a skeleton look.
- Makeup Brushes: Choosing the best makeup brushes for your set is crucial, as they help cover larger areas and define sharp lines around the face. Consider investing in a shadow switcher tool to easily switch between colours without needing multiple brushes.
- Eyeliners: A black liquid eyeliner is perfect for defining intricate details such as the teeth and nasal cavity. A black pencil liner will be useful for softer shading and blending around the eyes and contours.
- Setting Spray: To ensure your makeup lasts throughout the night, use a high-quality setting spray like Ben Nye or Mehron. This will keep your makeup intact and prevent smudging.
- Extras: While not necessary, adding fake lashes can elevate your skeleton makeup ideas, giving your look a dramatic flair.
What is the Origin of Skull Makeup Male?
The history of skull makeup is deeply rooted in cultural traditions and rituals. Originally, skull makeup was primarily associated with the Day of the Dead celebrations in Mexico, where sugar skulls are used to honor deceased loved ones. Over time, this artistic expression has transcended cultural boundaries and has been embraced globally as a symbol of both remembrance and rebellion.
Why Choose Skull Makeup Male?
Choosing skull makeup for males is a bold statement of self-expression. It allows individuals to explore their creativity and showcase their unique personality through intricate designs and patterns. Whether it’s for a themed event, a photoshoot, or simply for fun, skull makeup offers a chance to stand out and make a lasting impression.
Also Read : What Are The Best Makeup Ideas For Wedding Day?
Conclusion
Mastering the art of skeleton makeup is a fun and creative way to transform your look for any spooky occasion. With the right tools, techniques, and attention to detail, you can achieve a jaw-dropping skeleton look that will leave everyone in awe. Whether you’re aiming for a spooky, glam, or eerie effect, the skeleton makeup style is versatile and can be customized to fit your personal taste.
By following the step-by-step guide outlined above and practicing your skills, you’ll be able to create a spooky transformation that’s sure to turn heads. So, gather your tools, put on your creative hat, and get ready to master the art of skeleton makeup.
FAQs
How long will skeleton makeup last?
Skeleton makeup can last for several hours if applied correctly. Using a primer, setting powder, and setting spray can help ensure the makeup stays intact.
Can I use regular makeup products for skeleton makeup?
Yes, but it’s recommended to use face paints specifically designed for body art as they are more pigmented and long-lasting.
How can I remove skeleton makeup?
Use a gentle makeup remover or micellar water to remove face paints. Follow up with a cleansing routine to ensure your skin is free of any residue.
Is skeleton makeup safe for sensitive skin?
Always perform a patch test before applying any makeup to your face, especially if you have sensitive skin. Opt for hypoallergenic face paints when in doubt.
Can I make my skeleton makeup more realistic?
Yes, adding shadows, cracks, and texture to your makeup can make it look more realistic. You can also use contact lenses and body paint for a fuller transformation.
How do I keep skeleton makeup from smudging?
Setting your makeup with powder or spray will help prevent smudging. Avoid touching your face once the makeup is set.
Can skeleton makeup be worn for other events besides Halloween?
Absolutely! Skeleton makeup can be worn for Day of the Dead celebrations, themed parties, theater performances, or any creative event that allows you to showcase your artistic skills.